COURTESY : home.howstuffworks.com
COMPOSTING
Americans generate about 210 million tons (231 million short tons) of trash, or solid waste, each year. Most of this trash (57 percent) gets placed in municipal landfills. About 56 million tons (27 percent) is recovered through either recycling, in the case of glass, paper products, plastic or metals, or through composting, in the case of yard waste. Composting is a method for treating solid waste in which organic material is broken down by microorganisms in the presence of oxygen to a point where it can be safely stored, handled and applied to the environment. Composting is an essential part of reducing household wastes. It can be done inexpensively by every household and produces a product — finished compost or humus — that can benefit the environment as a natural fertilizer for gardening and farming.
In this article, we’ll look at what happens when solid waste is composted, how you can make your own compost, why you benefit from composting, and how you can make a benchtop compost column to study composting in a classroom laboratory or science-fair setting.Contents
Composting Biology
Composting creates the ideal conditions for the natural decay or rotting processes that occur in nature. Composting requires the following:
- Organic waste – newspaper, leaves, grass, kitchen waste (fruits, vegetables), woody materials
- Soil – source of microorganisms
- Water
- Air – source of oxygen
- During composting, microorganisms from the soil eat the organic (carbon containing) waste and break it down into its simplest parts. This produces a fiber-rich, carbon-containing humus with inorganic nutrients like nitrogen, phosphorus and potassium. The microorganisms break the material down through aerobic respiration, and require oxygen that they get from the air you introduce when you turn the material in the compost bin. The microorganisms also require water to live and multiply. Through the respiration process, the microorganisms give off carbon dioxide and heat — temperatures within compost piles can rise as high as 100 to 150 degrees Fahrenheit (38 to 66 C). If the compost pile or bin is actively managed by turning and watering it regularly, the process of decomposing into finished compost can happen in as little as two to three weeks (otherwise, it may take months).The compost conditions must be balanced for efficient decomposition. There must be:
- Plenty of air – mixture should be turned daily or every other day
- Adequate water – mixture should be moist, but not soaking wet
- Proper mix of carbon to nitrogen – ratio should be about 30:1 (see Elements of Composting: C:N ratio and Virtual Pile for details)
- Small particle size – big pieces should be broken up, as smaller particles break down more rapidly
- Adequate amount of soil – should provide enough microorganisms for the process
- Downwind from your house – Even a well-managed compost pile may occasionally emit unpleasant odors.
- Wind – Although wind provides air, too much wind can dry and/or scatter the material.
- Sunlight – Sunlight can help warm the compost pile in the winter, but too much sunlight can dry it out. If the pile is located by a large deciduous tree, you will have cool shade in the summer and sunlight in the winter.
- Drainage – You want good drainage so that water will not accumulate by the pile.
- Surface – Bare earth is better than concrete. Make sure to give yourself a sufficient work area around the pile (6 to 8 ft, or about 2 m).
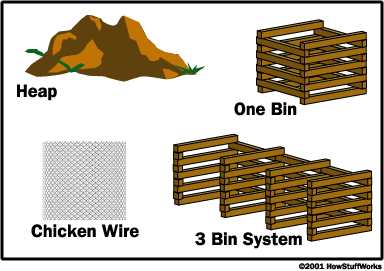
 Compost structures come in many shapes.Choose a Structure
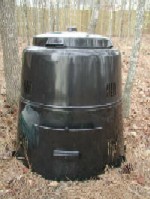
Compost structures can be as simple as a heap where you just pile all of the ingredients and let nature take its course — this is passive composting. Passive composting is less efficient and slower than active composting, in which you manage the compost process on a daily basis.You can also build more complicated compost bins out of chicken wire, wood or concrete blocks. They can be simple, one-compartment structures in which you add new materials to the top, turn the compost frequently and collect the finished compost from the bottom. PHOTO COURTESY KARIM NICECommercialhome composting unitThey can also be multi-compartment (three-bin) structures in which you add new material to one bin, transfer partially-completed compost to the middle bin and move finished compost to the final bin. There should be some covering on the top of the bin to minimize excess rainwater and reduce scattering from the wind. Many varieties of compost bins are available commercially.The choice depends entirely on the effort and expense that you wish to devote to the project, as well as the amount of compost that you wish to make. Also, local ordinances may dictate what kind of bin you can use.Add the Ingredients
You can compost the following materials easily:Composting Meat & DairyMeat and dairy products are high in fat. They will cause an unpleasant odor if added to a passive pile or poorly-managed active compost pile. For a hot, well-turned compost pile, meat and dairy wastes are not a problem. However, it is better to run the wastes through a blender or food processor to reduce their size and speed their decomposition.- Kitchen waste – best to chop up or grind the wastes so that they can be broken down faster
- Yard waste
- Grass clippings – Some grass is okay, but too much will add excess nitrogen to the compost pile and make it smell bad. It may be best to use a mulching lawn mower for your grass.
- Leaves
- Pine needles
- Weeds
- Woody materials (branches, twigs)
- Straw or hay
- Newspaper
- Seaweed, kelp or marsh grass hay – If you live by the ocean and it is legal to harvest these, they are excellent, nutrient-rich materials. Rinse or soak them thoroughly in fresh water to remove excess salt before adding them to your compost pile.
- Sawdust – This is an excellent source of carbon.
 PHOTO COURTESY KARIM NICEKitchen and yard waste in a compost binThe following materials SHOULD NOT BE COMPOSTED:
- Human waste or pet litter – They carry diseases and parasites, as well as cause an unpleasant odor.
- Diseased garden plants – They can infect the compost pile and influence the finished product.
- Invasive weeds – Spores and seeds of invasive weeds (buttercups, morning glory, quack grass) can survive the decomposition process and spread to your desired plants when you use the finished compost.
- Charcoal ashes – They are toxic to the soil microorganisms.
- Pesticide-treated plant material – These are harmful to the compost foodweb organisms, and pesticides may survive into the finished compost.
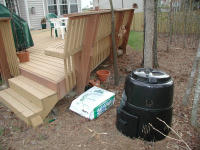
 PHOTO COURTESY KARIM NICEWhere do you want your compost pile?To make compost, you must do the following:
- Choose a site for the compost pile.
- Choose a structure.
- Add the ingredients.
- Care for and feed the compost pile.
- Collect the finished compost for use.
Where you want your compost pile is an important question. You want to be able to compost discretely away from your house, but not so far away that you may not want to go out and attend to it. Also, you do not want it so close to the boundaries of your property that your neighbors might complain. Part of the answer may be dictated by local housing ordinances or homeowner organization rules that may specify where a compost pile can be located. Other factors to consider include the following:Here are some signs that your compost pile is working properly:- It does not smell bad. It should have a sweet, earthy smell, like peat moss.
- It is warm. The microorganisms are “cooking away” and you may even see some steam rising from the pile, especially on a cool morning.
- You may see some gas bubbles in the pile, because carbon dioxide is being released as the microorganisms do their work.
The finished compost will collect at the bottom of the bin in a single bin system or at the third bin in a three-bin system. There is no strict definition of when the compost is done. Basically, if you think it’s done, it’s done. Here are some parameters that you can use to judge this:- Temperature – After you turn the pile, measure the temperature. If it is below 100 F (38 C), then it is probably done.
- Appearance – Does the material look at least 50 percent decomposed? Can you recognize anything in it as the trash you put in?
- Size – Has the volume of the compost reduced by 50 to 75 percent?
- Color – Is it dark brown or black?
- Texture – Is it smooth or crumbly?
- Smell – Does it smell earthy like soil?
- Improve the soil structure in your garden or yard
- Increase the activity of soil microbes
- Enhance the nutrients of your soil
- Improve the chemistry of your soil, particularly the degree of acidity (pH)
- Insulate the changes in soil temperature around plants and trees
- Improve insect/disease resistance in your garden plants and trees
- Three clear, plastic, 2-liter soda bottles with caps – cleaned, with the labels removed
- Window screen – 2-inch by 2-inch (5-cm by 5-cm) square piece (hardware stores may have scrap pieces this size)
- Piece of wire – 6 inches (15 cm) long; picture frame wire or electrical wire works well (hardware stores may have scrap pieces available)
- Small nail, skewer or dissecting needle
- Clear, plastic packing tape
- Coffee filter – basket type
- Pair of pantyhose
- Scissors
- Newspaper
- Soil
- Trash to be composted
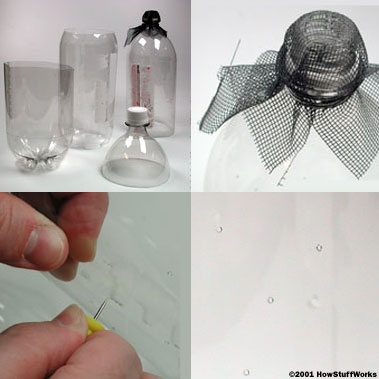
 Assembling the compost column from pieces of 2-liter soda bottles (top left): Window screen is wrapped around Bottle 3 (top right); air holes are poked into Bottles 2 and 3 with a needle (bottom left, bottom right).To assemble the compost column, do the following:
- Use the scissors to cut the three bottles as shown. Cut Bottle 1 in half and trim the top portion just below the curve. Cut the top and bottom of Bottle 2 along the curved portions. Cut the bottom off Bottle 3 along the curved portion.
- Take Bottle 3, wrap the window screen over the mouth of the bottle and fasten it below the neck with the wire, as shown here.
- With the nail, skewer or needle, poke many air holes in the sides of Bottle 2 and 3, as shown.
- Place Bottle 3 upside down in the bottom half that was cut from Bottle 1, as shown, and fasten it with tape. You may want to use a few pieces of tape that you can remove periodically to drain the water that will collect in the bottom half.
- Place Bottle 2 inside Bottle 3, as shown below, and fasten it with tape.
- Take the top piece from Bottle 1, with its cap, and use it to cover the open end of Bottle 2. This will be the cap of the finished compost column, as shown below.
 Stacking the pieces of the compost column (tape has been omitted for clarity)To load the compost column, do the following:
- Place the coffee filter snugly in the bottom of Bottle 2 so that it sits just above the opening. The coffee filter acts as a pre-filter to keep the screen from becoming clogged with soil particles.
- On a sheet of newspaper, mix the soil and trash to be composted. You can experiment with the amounts of soil and trash used.
- Fill the compost column with the soil/trash mixture.
- Cap the compost column. Fasten the cap with tape.
- Add water to the column through the top-bottle cap. You can measure the amount of water if you wish, and see how much works best. Water will percolate down through the soil/trash mixture and collect in the bottom. You will have to drain the bottom periodically.
- Cut one of the legs in the pantyhose, turn it upside down and cover the compost column with it. The pantyhose cover is effective in keeping fruit flies and gnats from moving in and out of the column.
 Coffee filter used as a pre-filterYou will have to continually add water and drain the bottom, either daily or every other day. You can turn the compost if you want to, but you can also leave it as is — the air holes in the side should provide sufficient aeration.Here are some experiments that you can do with your column:
- Weigh the column daily and graph the change in weight as the compost develops.
- Monitor and graph the amount of water used by the column daily. Do this by subtracting the volume of water collected at the bottom from the volume of water you”ve added to the top.
- Measure the temperature of the column with a soil thermometer daily and graph it.
- Take notes about the appearance of the trash in the column daily. How long does it take to decompose?
- Collect the drainage water and look at it under a microscope to see the microscopic organisms that live in the compost.


hi!,I really like your writing very a lot! share we keep in touch more approximately your post on AOL? I require an expert in this house to solve my problem. Maybe that’s you! Having a look ahead to look you.
https://www.electricpercolatorcoffeepot.com/a-battery-operated-coffee-pot-lets-you-savor-coffee-on-the-go/
I like this website so much, saved to fav. “American soldiers must be turned into lambs and eating them is tolerated.” by Muammar Qaddafi.
https://www.electricpercolatorcoffeepot.com/a-battery-operated-coffee-pot-lets-you-savor-coffee-on-the-go/
I am continuously looking online for tips that can assist me. Thx!